GeoMaestro
Tutorial 2: using the GUI to create a hardcoded composition
In this tutorial we will focus on the way you can program from scratch a musical composition as a KeyKit function, using the GUI to produce the most significant parts of the code.
In the following, a button labeled "this" will be designed by [this]; hypertext links will refer to parts of the manual when you will have information on a particular topic. You only need to follow them if you feel you don't understand what we're talking about. Also, some links refer to midi files.
Open KeyKit on an empty page with a rather large console window (at least a wide one 4 to 6 lines high), then launch the GeoMaestro GUI.
When you open the GUI (KeyKit root menu Tools1 -> Geo Main GUI or Tools1 -> --Geo GUIs--), the event scene is loaded from the init.ev file (if present) in the BASE directory. So if you work on a large composition, it's there that you should save the scene you're currently working on (you can set the value for BASE in the intialisations.k file).
For now, let's erase the current Ev scene since we're starting from scratch: click on [ev] to bring up the buttons relative to the Ev management if they're not already present, then click on [new] and confirm. Now the graphic part of the GUI should be blank. You may want to use [grid] to display axes or grids.
We saw in tutorial 1 how to create simple events. This time, let's do it another way: set the mouse mode 1 to be "plug-in" (it is the last one in the menu)
Now we can use any plug-in from the library with the left mouse button. Click on the plug-ins menu button (the one right above [display] and select "Clavier" at the menu.
To create a new event, click somewhere in the graphic area and keep the mouse button down. You will see a red grid with notes arranged in boxes. Drag the selection rectangle to the note value you want, then release the mouse button.
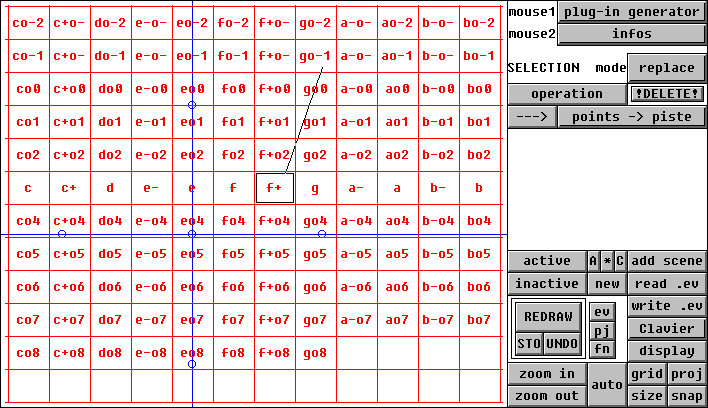
You just created an event in the current channel (which should be number 1) !
Create a couple more events, with different notes, then click on [pn] and select channel 2 with the [ch..] menubutton. Again, create a couple of events, this time affected to chanel 2.
When the GUI was launched, it checked for an init .geo file in the BASE directory. This file contains definitions for points, circles, segments and regions. Provided in the distribution is an init.geo where are defined the points Or (origine), Oi, Oj, Oim, Ojm (representing the unitary vectors on the axes). Display them by clicking [display] and entering Or, Oi, Oj, Oim, Ojm
at the prompt.
You should now have something like this:
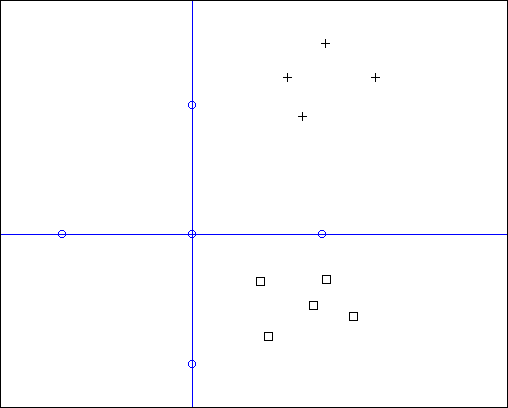
We're going to use another plug-in to set the volume and durations of the events we just created (the "Clavier" only lets you choose pitches, and give a duration of 1 beat, that is 96, and a volume of 63)
So now select the plug-in "ModNodur". You will have to go back to the correct set of buttons by clicking [ev].
Now, when you click on an event's symbol and drag the mouse, you can set at the same time duration and volume for this event: the volume depends on the angle you draw (63 is horizontal to the left, 0 is horizontal to the right), and duration depends on the length of the segment you draw. The first red circle is one second away from the event, the second one two seconds away, etc.. (Note that this representation of duration is the same as the default one use for projections, through the CPCM parameter)
At the console, the numeric values are displayed (in parenthesis are the current values)
Note: the interesting thing with "Clavier" and "ModNodur", is that they are implemented in a very simple way as plug-ins for the GUI. You can look at their code in the lib_gen.k file, and easily write your own mouse modes (see here for details).
Another way to set volume and duration, could be the following: select this event (use the "selection" mode for mouse 2 and draw a rectangle around the event: it will become red), then click on [operation] and type this at the prompt:
N_.vol = 100; N_.dur = 192
Now let's define which instrument is associated to which channel: click on [pn], then choose the instrument you want for channel 2 (say: "Xylophone") in the upper menubutton, and click on the arrow button beside the [PAC] one, then confirm at the prompt (just press RETURN). In the console should be displayed the settings for channel 2.
Do the same thing for channel one, this time choosing the "Acoustic Grand" piano.
You can listen to the events' nodurs by choosing the mouse mode "hear ev/seg" and clicking on the events' symbols (provided that you have some sound device connected to the midi out port !)
Let's say that our scene is complete ! To save it, click on [ev] then on [write .ev] and give it the name "tut2.ev", in the GeoMaestro/data/ or GeoMaestro/userlib/ directory
Now, let's make a few projections: create two points A1 and A2 with the "new point" mouse mode (see tutorial 1 if you really have no hints !), and dispose them a bit like this (A1 is the upper one):
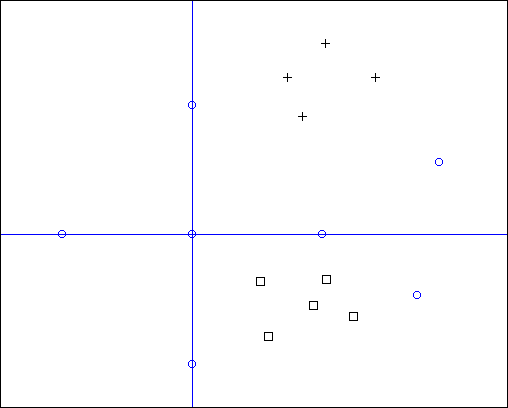
Then type the following command lines at the console:
CA1 = Cerc(A1, 0.3)
CA2 = Cerc(A2, 0.2)
COj = Cerc(Oj, 0.2)
COr = Cerc(Or, 0.3)
and now click on [display] and type this at the prompt:
CA1, CA2, COj, COr
You should now see this (click on [proj] to see the projections figured as red lines):
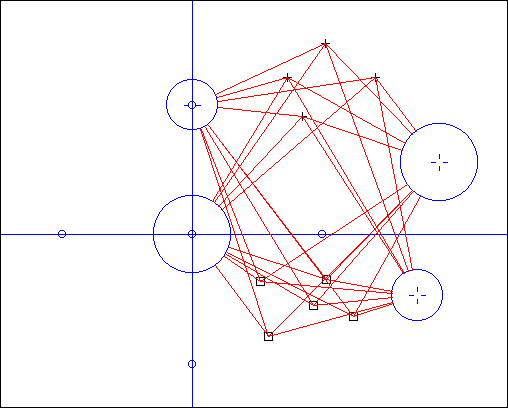
Now click on [pj], select the "Onde" projector, click on the [--->] button and enter the following arguments:
CA2, CA1, 10, 1, Oi
then click three other times on [--->] and give these arguments:
COr, COj, 10, 1, Oi
COj, CA1, 10, 1, Oi
CA2, COr, 10, 1, Oi
(more details about the "Onde" projector and its arguments here)
We just calculated four lignes. You can hear them with [hear] (select the ligne you want to hear from the menubutton just above); and you can display their "inter" circles by clicking [display] and typing:
£1, £2, £3, £4
Do it; you should have this now:
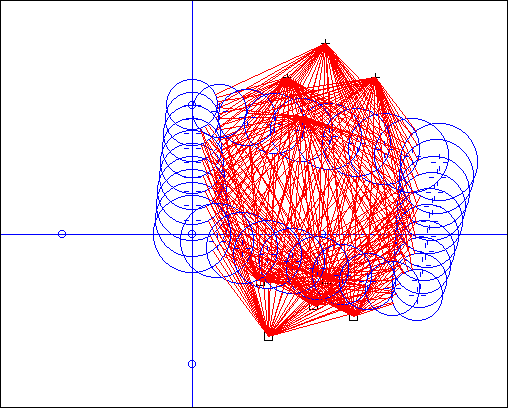
Hmm.. let's listen to the whole stuff, and see if it sounds "musical" (after all, we did this pretty much by chance up to now; intuition of the way it works is, hopefully, yet to come...). We want the four phrases (from the four lignes) to be merged in one single phrase (according to the | KeyKit operator). So click on [Ex], press RETURN once, and when you're asked for a group mode: type 2 for "merge". Then select the first item in the RL menu, which should be "group: -" (meaning that all lignes belong to the current group), and click on [hear]...
Sound should arise from your Midi out... is it interesting ? At least, there's some structure in it... Here's what I get: so_far.mid
Note that we only used projections as a way to set the time attribute of our initial notes, the music rythm, so to say. We can do much more: let's play a bit with the distortion functions.
Click on [fn], choose channel 1, click on [current] : the current settings appear in the console.
Ok, this is the piano; using the 3 buttons from the second line, give the function "Vexp" to Vol, "PseuDoppler" to Pit and "DurePlusAuLoin" to Dur (each time with the default parameters, by typing "-").
Now go back to [pj] and click on [redo] for each one of the four lignes. Click on [hear]...
Hear how the piano is much more lively now ? (well, I'm not saying this is music yet !)
OK, for the xylophone, give "Vexp" to Vol, "AigusAuLoin" to Pit and "PanWithDist" to Pan. Here's what I get: smoother.mid
Now we are going to use the "inter" circles to generate four other lines and slow down our composition: we'll make four new "Onde" going from the 10th circle in each one of the lines we have, and starting at the corresponding time.
So create the following circles at the console:
CL  = Cerc(Or, 2)
CLj  = Cerc(Oj, 2)
CL1 = Cerc(A1, 2)
CL2 = Cerc(A2, 2)
and use the "Onde" projector four times with the following arguments:
COr, CL, 4, 1, Oi, 0, £4i10d
CA1, CL1, 4, 1, Oi, 0, £3i10d
COj, CLj, 4, 1, Oi, 0, £2i10d
CA2, CL2, 4, 1, Oi, 0, £1i10d
There are more arguments now because we don't start at time t=0, but at the time corresponding at the beginning of the 10th circles (note that it's actually the same for each line here, but that's only because we made a very symetrical construction)
...now click on [display], type £5, £6, £7, £8
and you should have this now (with a bit of zooming out):
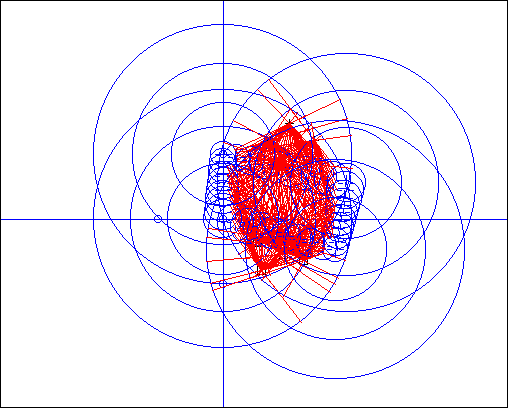
At this stage, you may want to have a look at the structure of the RL array (don't you ?), so at the console type Notepad(RL)
...and look around in the text editor to see if it makes sense to you. Documentation on the structure of lignes is here , documentation on the £ syntax as a shortcut for the RL array is there.
Let's say that we love the resulting sound and want to use it in a larger composition. To do so, it's time to introduce a fundamental feature of the GeoMaestro system: its ability to produce KeyKit code.
Click on [pj], check that the first item of the RL menu (the "group: -" one) is still selected, and click on [->], then press RETURN three times, and now you're asked if you want to create a function. Type the name of the function at the prompt:
Tuto2
Then at the console, type:
#include Tuto2.k
... that's it! Now Tuto2() is a function that calculates the 8 lignes, merge them in a single ligne and return it. It's ready to be used in a later program (we'll see that in a moment) or to be called at the console to hear how changes in the scene manifest themselves in the music, by querying its "ph" field, as in the following example:
InitPAC() + Tuto2()["ph"]
... where InitPAC() initializes each channel by sending its corresponding PAC (the lignes do not contain any bank or program change messages, except those that would be part of an event's nodur; only the PAC field is used to associate an instrument to a channel); also, note that Tuto2() does not any more rely on the RL array. You can check its code (and of course edit or delete it) in the Tuto2.k file that should be in your /userlib directory. Here it is:
# généré par GUI

function Tuto2()
{
   _RL = []
   nl = NewLigne()
   nl = MergeLignes(nl, (_RL[1] = Onde(CA2,CA1,10,1,Oi)))
   nl = MergeLignes(nl, (_RL[2] = Onde(COr,COj,10,1,Oi)))
   nl = MergeLignes(nl, (_RL[3] = Onde(COj,CA1,10,1,Oi)))
   nl = MergeLignes(nl, (_RL[4] = Onde(CA2,COr,10,1,Oi)))
   nl = MergeLignes(nl, (_RL[5] = Onde(COr, CL, 4, 1, 0, Oi,_RL[4][INTERs][10][T0s])))
   nl = MergeLignes(nl, (_RL[6] = Onde(CA1, CL1, 4, 1, 0, Oi, _RL[3][INTERs][10][T0s])))
   nl = MergeLignes(nl, (_RL[7] = Onde(COj, CLj, 4, 1, 0, Oi, _RL[2][INTERs][10][T0s])))
   nl = MergeLignes(nl, (_RL[8] = Onde(CA2, CL2, 4, 1, 0, Oi, _RL[1][INTERs][10][T0s])))
   return (nl)
}
This is the ouput I get: tuto2.mid
Now let's play a bit with what we have composed. Click [display] with the following arguments :
-£, -$p, Oi
and get rid of the red lines figuring projections with [proj]. Select the "zoom" mouse mode and click on the point Oi (the only point left displayed). This makes it the center of the screen, and we are going to use it as a center of rotation: select the "selection" and "rotate selection" mouse modes. Set the selection mode to "+geo.", then select everything with the mouse: only the circles and Oi should become red:
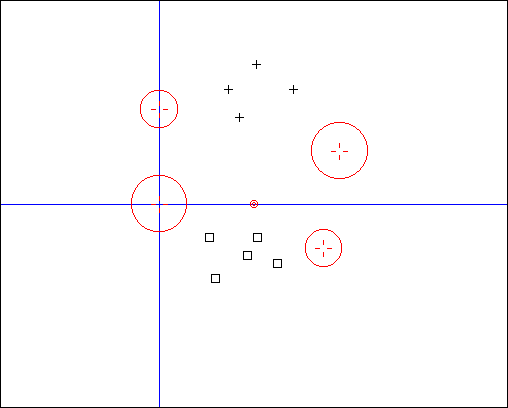
Now with the second mouse button click in the upper part of the grahical area and drag the mouse to the right, keeping the size of the rotation circle more or less the same; release the button; we just rotated the four initial circles:
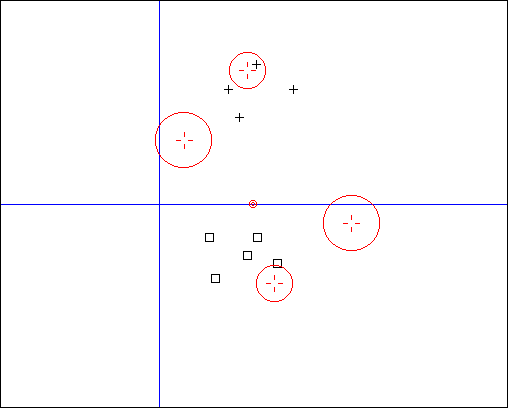
Now type this at the console: Tuto2()
... what your hear is the new rendering of our 8 projectors, the rotation having been taken into account.
Now, we are going to write a complete and standalone KeyKit function producing this composition. As we just saw with the Toto2() function, there's no need to write projectors calls, since the GUI can do this for us. But for Totu2() to work, we need the corresponding event scene and the settings for each channel; also, all the variables we used: Or, Oi, CLj, etc.. must be defined.
So, first of all, let's save the event scene: click on [ev] then on [write .ev], and save it as Tuto2.ev in the COMPOS directory.
The channels settings are saved in the same way: click on [fn], then on [S] and save them as Tuto2.df in the COMPOS directory.
Now for the variables: since we used the GUI for projections, they have been automaticaly stored in the GVARS array (which, by the way, is dumped with the tool). To check that all the variables required by Tuto2() are registered in GVARS, type this at the console:
Notepad(GVARS)
... the variables should appear as string indexes, with their corresponding values as strings. We need COr, COj, CA1, CA2, Oi, CL, CL1, CL2 and CLj. They should all be there, plus a couple more.
Note: automatic registration only applies when a single variable is used as a argument to a projector call. If the argument had been a formula (including the variable as part of it), the variable would not have been registered. In this case, having seen that, for example, CLj and CL1 are not indexes of the GVARS array, you would have to register them manually at the console:
RemVAR("CLj, CL1")
... Be careful to the syntax: RemVAR() takes a string as argument !
Now, type this at the console:
UpdateVAR()
HardCodeVAR("VarTuto2", COMPOS)
... this will create a VarTuto2.k file in the COMPOS directory, containing the code for a VarTuto2() function which initialize the variables that were registered in GVARS. The UpdateVAR() call is here to ensure that the values in the GVARS array are the actual current values for the registered variables (and we need it in our example because we moved the circles, remember ?)
So now we have all what we need to very easily write our function. Open any text editor, and write the following code to a file called Tutorial2.k:
function Tutorial2()
{
	VarTuto2()
	LoadEv("Tuto2", COMPOS)
	ReadDF("Tuto2", COMPOS)
	return (InitPAC() + Tuto2()["ph"])
}
That's it ! Now our work is saved: if you quit KeyKit and open it again, simply type
Tutorial2()
at the console to hear the composition. You can then open a Group Tool and select File > Read -> Last Console Phrase to have a piano roll representation that you can edit in the usual way.
If we copy/paste all the code in one file, and get rid of the useless variable declarations, here's how our composition eventually looks like:
# this composition requires the Tuto2.ev and Tuto2.df files to be present in COMPOS
# main function:

function Tutorial2()
{
	VarTuto2()			# declares the variables
	LoadEv("Tuto2", COMPOS)		# read the Ev scene
	ReadDF("Tuto2", COMPOS)		# read the distortion functions settings
	return (InitPAC() + Tuto2()["ph"])	# calculate projections
						#  and return the resulting phrase
}

# projections:

function Tuto2()
{
   _RL = []
   nl = NewLigne()
   nl = MergeLignes(nl, (_RL[1] = Onde(CA2,CA1,10,1,Oi)))
   nl = MergeLignes(nl, (_RL[2] = Onde(COr,COj,10,1,Oi)))
   nl = MergeLignes(nl, (_RL[3] = Onde(COj,CA1,10,1,Oi)))
   nl = MergeLignes(nl, (_RL[4] = Onde(CA2,COr,10,1,Oi)))
   nl = MergeLignes(nl, (_RL[5] = Onde(COr, CL, 4, 1, 0, Oi,_RL[4][INTERs][10][T0s])))
   nl = MergeLignes(nl, (_RL[6] = Onde(CA1, CL1, 4, 1, 0, Oi, _RL[3][INTERs][10][T0s])))
   nl = MergeLignes(nl, (_RL[7] = Onde(COj, CLj, 4, 1, 0, Oi, _RL[2][INTERs][10][T0s])))
   nl = MergeLignes(nl, (_RL[8] = Onde(CA2, CL2, 4, 1, 0, Oi, _RL[1][INTERs][10][T0s])))
   return (nl)
}

# variables declarations:


function VarTuto2()
{
   CL = ["c"=["x"=0,"y"=0],"r"=2]
   CL1 = ["c"=["x"=1.90676,"y"=0.556446],"r"=2]
   CL2 = ["c"=["x"=1.73952,"y"=-0.469374],"r"=2]
   CLj = ["c"=["x"=0,"y"=1],"r"=2]
   COj = ["c"=["x"=0,"y"=1],"r"=0.2]
   Oi = ["nom"="Oi","s"="","x"=1,"y"=0]
   CA1 = ["c"=["x"=1.90676,"y"=0.556446],"r"=0.3]
   CA2 = ["c"=["x"=1.73952,"y"=-0.469374],"r"=0.2]
   COr = ["c"=["x"=0,"y"=0],"r"=0.3]
}
-- Back to the tutorials index--
-- Back --


