GeoMaestro

-- Back --

Toys and closures


Introduction and concepts


(You may directly jump to the next chapter if you simply want the documentation explaining how to use a Toy)


GeoMaestro is a complex system. Its main GUI is intended to keep most of its complexity and power available in one front-end, which makes it quite a complicated tool, best fit for research purposes.

Exploring a specific algorithm or set-up for music asks for another kind of tools, much lighter: here come the Toys. They are standalone KeyKit tools embedding a GeoMaestro algorithm and scene, with a set of controls allowing easy tuning of selected parameters.

There are two sides in this topic, which are documented in this page:
To be complete, a Toy must also embed an event scene, which leads us to the concept of closure. A Toy contains its own version of the Ev scene and its own version of the whole set of distortion functions. It can thus be used standalone and will not interfere with the main GUI or others Toys. Such a local environment is called a closure.

A closure can also be used as is, independently from any TYK, as a reference to a specific set-up. On the other hand, a Toy can also be open to the current scene, that is, do not have an associated closure. The whole thing is very flexible. See exemples in the Compositor chapter.


Using a Toy


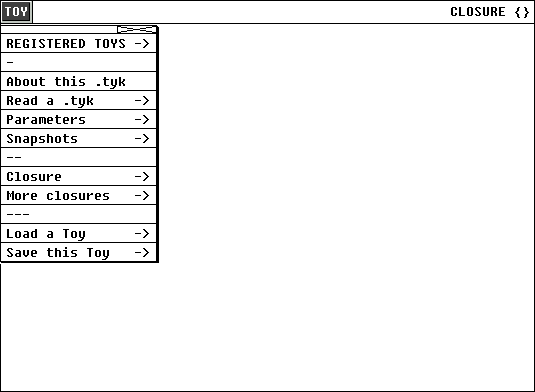
Open a void Toy (a closure) by clicking the Tools1-> GM>> Toy item in the root menu. You will get a blank tool with "CLOSURE" written at the top right and a "TOY" menu at the top left:


Don't worry for now about the items in the "TOY" menu: you do not need any of them to operate the Toy. Simply select REGISTERED TOYS -> and fetch the Toy you want to open in the submenus.

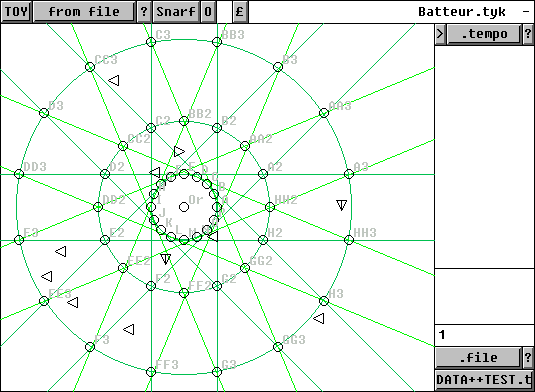
The tool will change: new controls will appear at the top and right, and new symbols will populate the main graphic area.

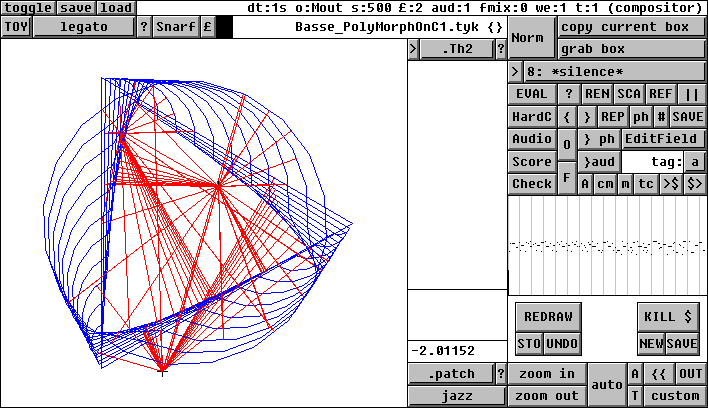
For example, it may now look like this (a Batteur set-up):


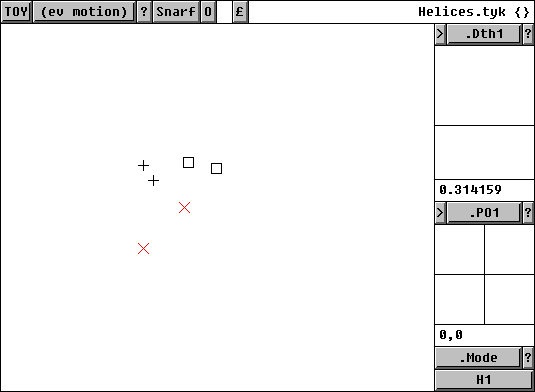
.. or like this:


This Toy is associated to a configuration file which defines the way it works and the operations it performs (its algorithm).
Here we can see at the upper left that the configuration file is Helices.tyk (by the way, note that different Toys can be associated to the same configuration)

The [Snarf] button executes the algorithm and snarfes the resulting phrase. The [0] button sends the last calculated phrase to MIDI out.

Some configurations propose more than one algorithm: you can then select the one you want with the upper left menu button (the one labelled "(ev motion)" in our example).

A description of the current algorithm is available from the upper [?] button. Also, you can visualize the projections it relies on by hitting the [£] button.


Now the interesting part of the Toy is how you can parameter it. Which parameters are available (if any) depends on the configuration.

In our exemple, we see at the right side of the tool a .Dth1 parameter associated to a slider, just below: its current value is 0.314159. To know what this parameter is about, click the corresponding [?] button.

Similarly, we have a .PO1 parameter associated to a 2-D slider: its current value is ["x"=0,"y"=0].

Moving the sliders update in real time the parameters values. You can also directly type the desired values by clicking the [>] buttons. Giving "-" as a value restores the default one.

We have a third parameter, .Mode, associated to a menu button. Its current value is "H1"

So let's summarize what we have seen: to play the Toy, the general idea is to choose an algorithm (if several ones are available), then set up the parameters, then [Snarf] the result.

You can at any time see the projections by hitting [£], and you can refresh the display by clicking anywhere in the graphic area. The empty rectangle at the right side of [£] is a toggle: if it is black, then [£] will be invoked whenever the display is refreshed.

The display itself is made of black symbols for the events in the scene local to the Toy (its associated closure), and of red crosses associated to the two-dimensional parameters.

When you move the 2D slider, a green reference will show you which point you are indicating. At the next redraw, this will lead to the motion of the corresponding red cross.

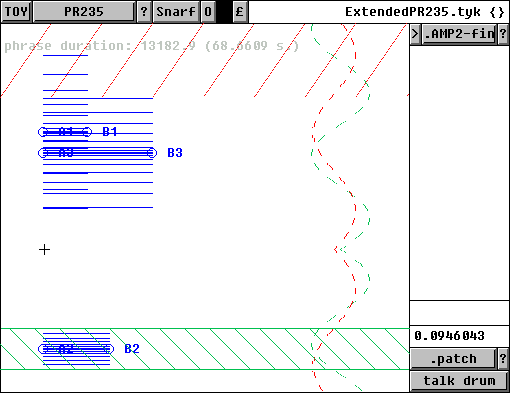
Some Toys can have a very complex display responding to slider motions. In the following example picture, the width of the green ribbon at the bottom is linked to the slider setting at the right (note that this Toy does not feature a 2D slider):


... this makes it easier to understand the meaning of some parameters.


There can be any number of modifyable parameters: for each class of parameter (number, point or menu item), click on the menubutton where the parameter name is displayed to see the list of available parameters in this class.

The dot before a parameter name means that it is local to the Toy. At the opposite, a parameter whose name is not prefixed with a dot is global, and modifying it from the tool will change its value everywhere. Weither a parameter is local or not is decided by the configuration file. Most often, all parameters are local.


Snapshots

The TOY menu lets you handle snapshots (memories of the state of all parameters in the tool). You can make a new one, restore, delete or overwrite an existing one. The number of snapshots is not limited.

If the name you give to a snapshot contains ":", this will define a tree structure in the snapshot sub-menu, so that you can organize the snapshots as you like. You should not give the same name to different snapshots, though, even if they are located in a different place in the tree.

Snapshots are saved along with the Toy (using the last item in the TOY menu). This is the only way to save them.


Csound Toys

Some Toys produce Csound scores instead of MIDI phrases. In that case, the [Snarf] button calculates the projection and Snarfs an empty phrase ´´, while the [0] button calls Csound and render the composition. This requires that all audio settings are correct.


This is it. How to integrate a Toy within a Compositor graph is described in a following chapter.

And if you want to understand how this works, just go on to the next chapter. Eventually we will also see how you can create you own Toys.

A reference of provided Toys can be found here.


Closures


A closure is an instance of class GMclosure, embedding a scene and a set of distortion functions (the code lives in lib/closure.k). Each Toy is the parent of a closure: I call it its associated closure.

A Toy is actually the meeting of a configuration file and a closure. The configuration file (in short I call this a TYK, a ToY Kode file) describe a projection algorithm. This algorithm is performed on the closure, which is completely independent from the current global Ev scene and the current distortion functions.


You can change the closure associated to a Toy by importing the current Ev and distortion functions into the closure, overwriting it ("TOY" menu item import closure).

Note that this is what happen when you first open a Toy: it simply grabs the current environment and makes a closure. At this stage, saving the Toy just saves the closure (more about this later)

In the other way round, export closure replaces the global Ev and distortion functions with the closure.

The Swap closure<->Ev item will do both at the same time. This is quite convenient if you want to modify the closure with the main GUI while keeping the current environment: swap the closures, edit the scene, then swap again.


It is also possible to apply the TYK on the current Ev scene: select (no closure) to do so. The Toy will become open to the outside world, which you can tell by the "-" symbol replacing "{}" at the top right of the tool.


Advanced use of closures

You can access the closure associated to a Toy by invoking its method getclosure()

When programming, the object ID of a closure (either a closure associated to a Toy or an isolated one) can appear as the last argument in a projector call. In this case, the projection will be evaluated within the closure.

The ID argument may appear after the optional arguments duration, t0, region and df, or instead of any one of them. The OptArgs() function, called by all (non-meta) projectors, will take care of it whatever its position. (Technical note: meta-projectors also handle closures but in a different way, by calling AddClosureArgument(); check their code if you want to write your own)


If for some reason you want to access directly the closure event scene and distortion functions, here are the corresponding methods (see class GMclosure documentation for more):
getEv  # returns the local event scene
getDF  # returns an array containing all distortion functions and their arguments
       # example for recovering Volume settings for channel ch:
       #    volfunction = cloid.getDF()["Volume"][ch]
       #    volarguments = cloid.getDF()["VolumeArgs"][ch] 


Composing with Toys and closures


A Toy can be imported as a box within the Compositor, just like any KeyKit tool: simply type its class name, wGMtoy.

You may also use the keywords toy or closure, in which case the name of the imported box will be a number within brackets, like {57}.

This number can be used later on as a reference for the closure associated to the Toy. Any projector call whose last argument is GMC(57) will be evaluated within that closure. You can also get the Toy ID by calling ToyID(57).
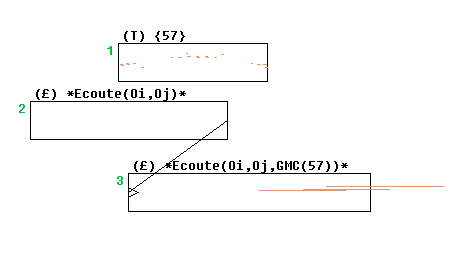
In this example of graph:


... box 3 references the same projection as box 2, but relatively to the closure of box 1. As a consequence, the evaluation result is very different.

Note that box 1 doesn't need to be evaluated nor linked to the composition in order to act as a closure. The closure only has to exist. Evaluating a Toy box is a different process: it depends on the Toy algorithm. If the Toy is simply a closure, it will return an empty ligne.


Now doing [REF] on a (T) box with a Toy, we get something like this:


This makes a handy framework for exploring the algorithm and the way it integrates within a composition: clicking [Snarf] in the Toy calculates the projections and as a side effect the right window in the compositor is updated, so that we immediately see the resulting phrase. On the over hand, clicking [EVAL] in the Compositor evaluates the composition and displays the result.


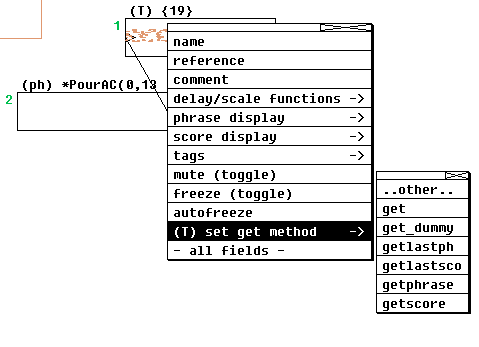
There is a subtle issue here. The .get() method of a Toy, which is the method used by default within the Compositor in order to evaluate it, triggers its algorithm, much like the [Snarf] button of the Toy.

Now if the algorithm is slow, it may be cumbersome to have to wait both when [Snarfing] and [EVAL]uating the composition. It could be more interesting to directly get the last [Snarf]ed value when [EVAL]uating, without having to calculate the algorithm again.

This is possible by replacing the evaluation method. Use the EditFields plug-in to set which method you would like:


Csound Toys

Some Toys produre a Csound score. In most cases, they embed the references for the corresponding score header part (which notably specify which is the associated orchestra): you can get it by calling the .getscoh() method of the Toy.

So if the toy ID is, say, $123, the corresponding header box (h) can be imported with the command
hv $123.getscoh()
The problem here is that when saving/restoring the composition, it is very unlikely that the Toy ID stays the same. So better use the number within brackets which identify a closure within the box structure. If the toy box is named "{14}", this will do the trick:
hv ToyID(14).getscoh()
This is what the "htoy" import shortcut does:
htoy 14


Creating a Toy


A Toy is a TYK, plus a closure, plus a set of values for the modifyable parameters.


1) Making a new toy associated to an existing TYK

Simply use the "Save this Toy" entry in the TOY menu to save the current state of your Toy. It may have a closure, which will then be saved, or be open to the global environment, in which case the *.toy file only contains the TYK reference and the current value of its parameters.


2) Writing a new TYK

See the next chapter for the syntax of a Toy configuration file (TYK).

The easiest way to create a new TYK is to make use of the ClickForTyk main GUI plug-in. The plug-in assumes that you want to wrap one or more lignes from the RL array into a Toy.

So first of all, set-up your scene and distortion functions, then call the projection you want to have available in the Toy with the regular projection button. You should invoke the projector arguments as follow: for arguments which you wan to keep constant, simply type their value; for arguments you want to become parameters in the Toy, use a global variable, and set its value to the default value you want it to have in the Toy.

For example, at the console type
PP = xy(1,1)
then project
Ecoute(xy(0,0), PP) 
if you want the second argument of Ecoute() to be a modifyable parameter with initial value 1,1
(the first argument will become hard-coded in the Toy)

Now zoom in you scene so that you get the area you want to see in the toy.

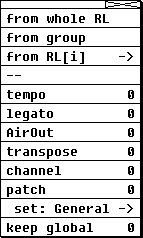
Everything is then ready for ClickForTyk: click anywhere in the graphic area. The following menu should pop-up:


All items below the "OPTIONS" separator are ..er.. options. Click to toggle their state between 0 and 1. Here are their meaning: Once this is done, use one of the first three items in the menu to select which lignes will be used as sources for the Toy. There will be as many different algorithms available in the Toy as there are source lignes (and twice this number if you selected the legato item).

... a pop-up console eventually asks you for a name for your TYK. If you simply press RETURN, the default name will be TestPlugIn, wich means the file is written in TOYDIR+"TestPlugIn.tyk". Otherwise, the file name will be TOYDIR+name+".tyk"

So that's it: a TYK has been written in TOYDIR (by default, this is the /toys folder in the GeoMaestro distribution). Now open it in a text editor and check it, especially the "code" fields: since the plug-in only performs basic string replacements to handle the conversion of variable to parameters, this procedure may very easily fail, so you will maybe need to do some corrections to get a valid TYK.

In our example, the ligne Ecoute(xy(0,0),PP) should lead to the "code":
"Ecoute(xy(0,0),~PP°"
which is OK.

...but the ligne SpiralAB(A,B) would become the "code"
"Spiral~A°~B°(~A°,~B°)"
which you would have to change for
"SpiralAB(~A°,~B°)"

Next thing to do: test your TYK by opening a Toy and doing "Read a .tyk" then selecting the new TYK in the browser. Check that it works OK by clicking [Snarf].

If everything is fine, the last thing to do is go through the file and fine-tune it, by settings the allowed ranges for parameters, filling in the "info" fields and renaming the commands since their default names are quite long (they are the projector calls themselves). You may also decide to convert some parameters from local to global, or the opposite.


What we have seen so far was the simple way: transforming a projection call stored in the RL array into a TYK. Now of course you may want to write a much more complicated TYK. Once again, please refer to the next chapter for the format of the file.

The main fields are the "code" ones, where the operations to perform are actually coded. The following points should be clearly understood:

The basic idea is that "code" is evaluated to perform the command. It should return either a Csound score, a phrase or a ligne.

Before evaluation, a few replacements are performed on the "code": The Toy closure ID cloid is necessary for the projector to be informed that the projection has to happen in a closure, and to get directly all necessary information from the closure itself.

As explained earlier, adding cloid after all other arguments in the projector call does the trick; this is why we have the automatic replacements of "()" and ")".

However, the "code" is not always as simple as a single projector call; this is why we have the "{o}" replacement.

Let's see on a couple of examples:


Syntax of configuration files (*.tyk)


An example file, extensively documented, is provided with the distribution: toys/Helices.tyk

Whenever a Toy is loaded, its associated configuration file is included into KeyKit with an #include command. This means that the overall syntax of the file is that of plain KeyKit code, and it also means that everything in it will be immediately evaluated.

The one and only required function in a TYK must be called ToyConfig_name() where name is the name of the TYK file itself.

It must return an array with the following fields:

In case you need them, the closure ID cloid and Toy ID tid are passed to ToyConfig_name() as its two arguments (actually, only tid would be necessary since we can always do cloid = tid.getclosure()).

Besides this required function, you may add any necessary KeyKit code to your TYK. So the recommended way to invoke complex algorithm is to use the "code" field of a command to call a function defined elsewhere in the TYK. Don't forget to pass it cloid and maybe tid (this may be handy if you have many parameters: you can get them directly though ToyLocal__[tid]["X"]).


Examples of complex TYKs are ExtendedPR235.tyk and zoziaux.tyk. They illustrate the following points:


-- Back --